
TB 9-5210-215-24
(3) With the bubble in the vial now on scale, but not necessarily centered, note the
exact location of the precision level on the surface plate and the exact position of the bubble
in the vial.
(4) Rotate the level 180 placing it precisely in the same location. Allow settling
time.
(5) Confirm that the bubble in the vial is in the same position as noted above. If
not, adjustment to the precision level is required.
(6) Precision level is verified to be accurate when the bubble in the vial is the same
in both positions.
d. Using verified precision level, ensure that the surface plate is level in the x and y-
axes to within 1 minor division. Adjust surface plate if necessary.
8. Angle Indication 0 to 45
a. Performance Check
NOTE
Always locate TI in the same footprint on reference surface
when changing TI position. Each time TI is relocated, allow at
least 10 seconds settling time before taking a reading.
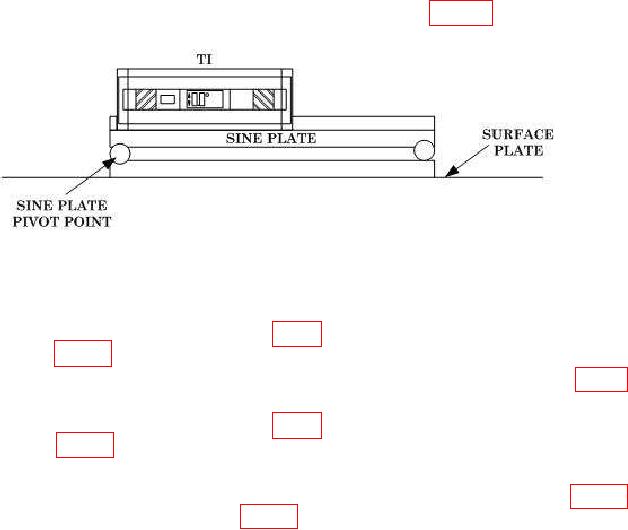
(1) Setup equipment on level surface plate as shown in figure 1 using the 5-inch
sine plate.
Figure 1. Angle Indication (0 to 45 ) Equipment Setup.
(2) Set TI to on and wait at least 10 seconds.
(3) Ensure TI HOLD and ALT ZERO functions are deactivated.
(4) Check TI in positions 1 through 4 (fig. 2). TI will indicate within limits specified
in first 4 rows of table 3. If not, perform b below.
(5) Insert into sine plate, a gage block stack equivalent to the value listed in table 3
for a 5 angle.
(6) Check TI in positions 1 through 4 (fig. 2). TI will indicate within limits specified
in next 4 rows of table 3. If not, perform b below.
(7) Remove gage block stack from sine plate.
(8) Repeat technique of (5) through (7) above for sine plate angles listed in table 3.
TI will indicate within limits specified in table 3. If not, perform b below.

