
TB 9-6625-2099-35
(13) Adjust LF R1436 and R1431 (LF R1436 for SN 159999 and below) (fig. 3) for best
flat top (minimum tilt) (R).
(14) Adjust LF R2436 and HF R2431 (LF R2436 for SN 159999 and below) (fig. 3) for
best flat top (minimum tilt) (R).
14. Risetime
a. Performance Check
(1) Set DISPLAY MODE switch to CH 1.
(2) Set CH 1 VOLTS/DIV switch as listed in first row of table 11.
(3) Connect oscilloscope calibrator CHAN 1 to TI CH 1 using a 50Ω feedthrough
termination and connect oscilloscope calibrator CHAN 2 to TI CH 2 using a 50Ω
feedthrough termination.
(4) Set oscilloscope calibrator EDGE output frequency as listed in first row of table
(5) Adjust oscilloscope calibrator output controls for divisions as listed in table 11
for oscilloscope display divisions.
(6) Adjust TI CH 1 POSITION, and TI time base controls to view waveform. If
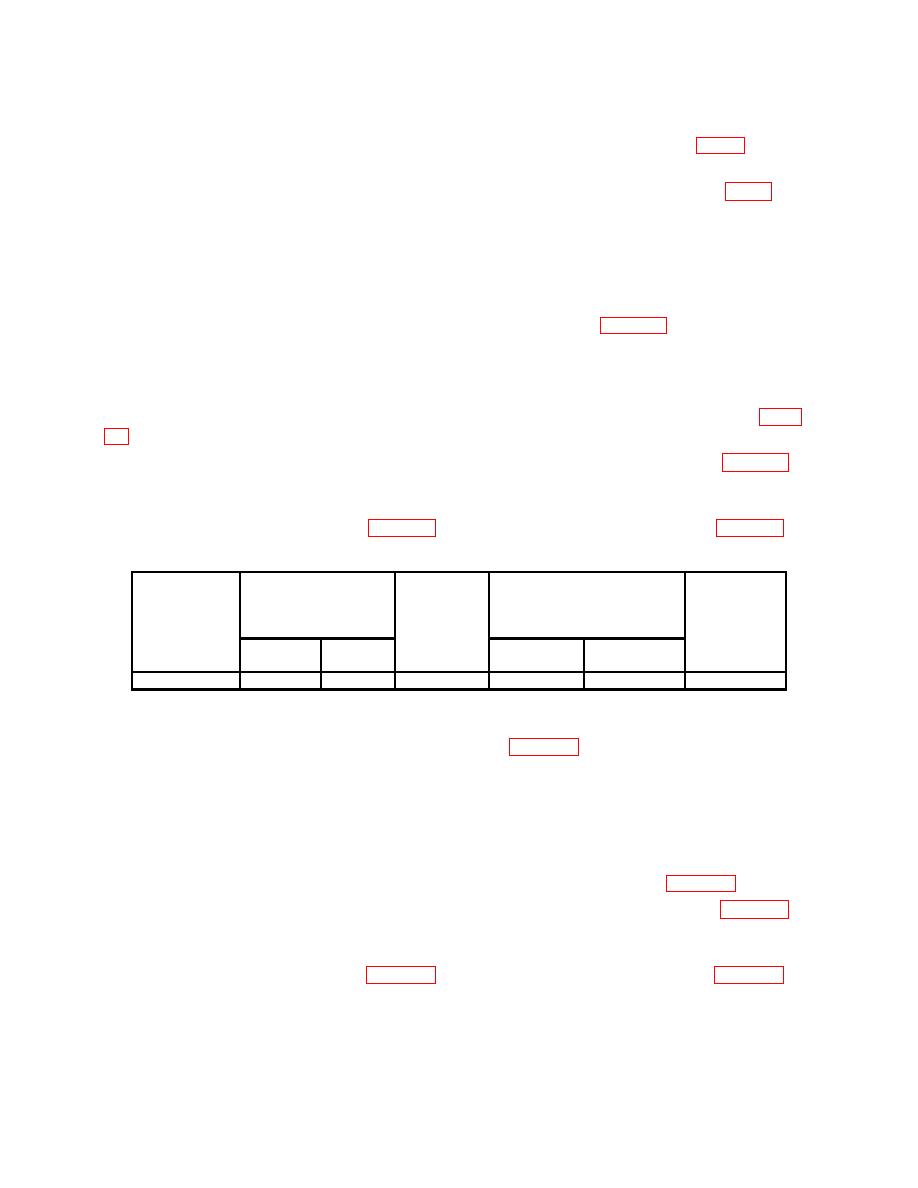
Table 11. Ch 1 Aberrations
Test
Test instrument aberrations
instrument
limits
Oscilloscope calibrator
VOLTS/DIV
EDGE
Test
Test
( 4 % and 6% pk-pk) of
switch
output
instrument
instrument
pulse amplitude
settings
aberration
display
(mV)
(MHz)
(mV)
adjustments
divisions
Pass
Fail
10
50
1
5
b(l)
(7) Set DISPLAY MODE switch to CH 2.
(8) Set CH 2 VOLTS/DIV switch as listed in table 12.
(9) Press oscilloscope calibrator CHANNEL pushbutton. Next press blue soft
pushbutton located below CHAN2 on oscilloscope calibrator when SELECT CHANNEL is
displayed.
(10) Ensure oscilloscope calibrator CHAN 2 is connected to TI CH 2 using a 50Ω
feedthrough termination.
(11) Set oscilloscope calibrator EDGE output frequency to listed in table 12.
(12) Adjust oscilloscope calibrator output controls for divisions as listed in table 12
for oscilloscope display divisions.
(13) Adjust TI CH 2 POSITION, and TI time base controls to view waveform. If

