
TB 9-6625-2323-24
(g) More, Config, Clock 40/10 to 40.
(h) Top Menu, More, Mode, press arrow key to highlight Single, Select, and
Previous Menu.
(i) Trigger, press arrow key to highlight Free Run, Select, and Previous Menu.
Previous Menu, Edit Period, 1, 0, kHz us Step, Edit Period.
(j)
(k) W/D List, Edit, 5, kHz us Step, and Edit.
(3) Set oscilloscope as listed in (a) through (f) below.
(a) Vertical 1 Input 50: to on (lit).
(b) Vertical 1 scale to 20 mV.
(c) Trigger Source to 1.
(d) Trigger Sweep to Auto.
(e) Trigger Slope to
.
(f) Horizontal sweep speed to 10 nS.
(4) Measure rise time and verify that the oscilloscope indication is less than the rise
time limit listed in table 17.
(5) Select the remaining oscilloscope measurement types listed in table 17 and
repeat (4) above for the appropriate type.
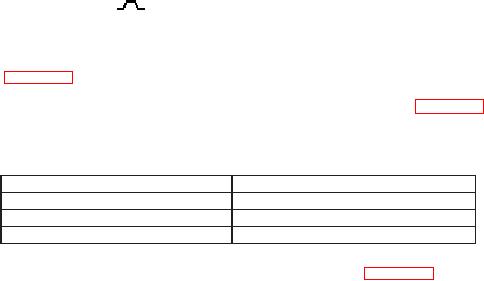
Table 17. Pulse Characteristics
Oscilloscope measurement type
Maximum indication
Rise Time
10 nS
Overshoot
10 %
Fall Time
10 nS
(6) Disconnect equipment setup and reconnect as shown in figure 3.
(7) Press TI keys as listed in (a) through (e) below.
(a) System, Reset.
(b) Output On Off to off.
(c) Level Control, L1, Edit L1, 0, dB, and Edit L1.
(d) Frequency Control, F0, Edit F0, 1, and GHz Sec dBm, Edit F0.
(e) Output On Off to on.
(8) Set spectrum analyzer as listed in (a) through (j) below.
(a) Preset.
(b) AMPLITUDE Y Scale, Ref Level, 1, 0, dBm.
(c) FREQUENCY Channel, Center Freq, 1, GHz.
(d) BW/Avg, Video BW to Auto.
(e) Res BW to Auto.
(f) SPAN X Scale, 1, MHz.
(g) Peak Search.
(h) Markero, Mkro CF.
19