
TB 9-6625-2089-24
NOTE
If wrong number of markers are present after making above
adjustments, perform b (2) through (9) below.
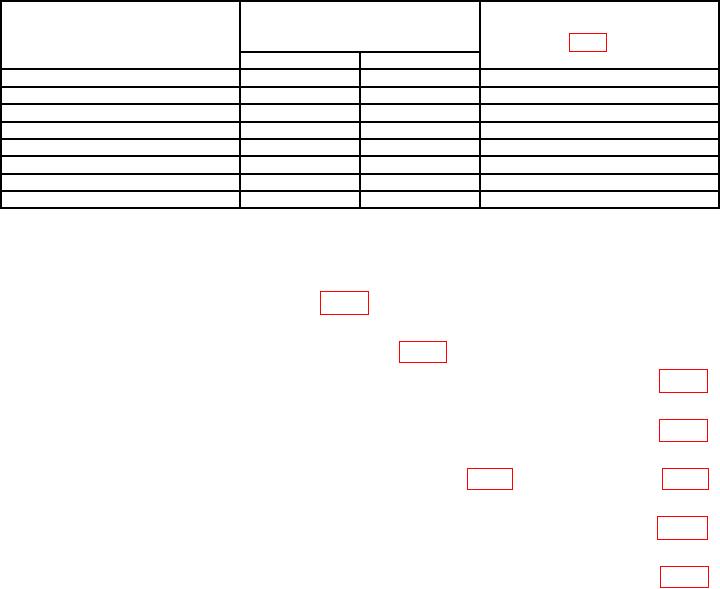
Table 9. RF Output Frequency Accuracy
Frequency counter
indications
Test instrument
Adjustments
(MHz)
markers (MHz)
(fig. 1) (R)
Min
Max
1027
1.0269
1.0271
A11A1R16 (MKR 3)
1029
1.0289
1.0291
A11A1R21 (MKR 4)
1030
1.0299
1.0301
A11A1R26 (MKR 5)
1031
1.0309
1.0311
A11A1R31 (MKR 6)
1033
1.0329
1.0331
A11A1R36 (MKR 7)
1035
1.0349
1.0351
A11A1R41 (MKR 8)
10501
1.0497
1.0503
A11A1R46 (MKR 9)
1010
1.0097
1.0103
A11A1R6 (MKR 1)
SIG GEN FUNCTION switch to SWP 20 MHz.
1Set
b. Adjustments
frequency counter. Adjust (A11MKR 2) (fig. 1) to align leading edge of 1025 marker with
birdie on CH2 of oscilloscope (R).
(2) Connect oscilloscope CH2 input to TPF7 (fig. 1), using X10 probe.
(3) Set SIG GEN FUNCTION switch to SWP 5 MHz. Adjust A11A1R80 (fig. 1)
for a pulse width of 780 μs as indicated on CH2 of oscilloscope (R).
(4) Set SIG GEN FUNCTION switch to SWP 20 MHz. Adjust A11A1R79 (fig. 1)
for a pulse width of 2200 μs as indicated on CH2 of oscilloscope (R).
to set the level of the ramp on CH2 of the oscilloscope to 0.0 V dc (R).
(6) Set SIG GEN FUNCTION switch to SWP 5 MHz. Adjust A11A1R74 (fig. 1)
for a -1.2 to +1.2 V ramp amplitude (R).
(7) Set SIG GEN FUNCTION switch to SWP 20 MHz. Adjust A11A1R66 (fig. 1)
for a -3.0 to +3.0 V ramp amplitude (R).
NOTE
While performing (2) through (7) above, observe the markers on
CH1 of oscilloscope. The markers should be inside the pulse in
(3) and (4) above and should coincide with the ramp in (6) and
(7) above.
(8) Repeat (2) through (7) above until the correct number of markers are present on
CH1 of oscilloscope.
(9) Repeat a (3) through (7) above.
23