
TB 9-6625-2343-40
(9) Using the V off value recorded in 13 a (4) above and C value from 13 a (7) above,
perform the adjustment calculation using the formula below:
Adjustment value = √ ((Voff2 - 200/1000) C)
(10) Adjust A32R4 LEVEL ADJ (fig. 17) to adjustment value calculated in (10) above. (R)
(11) Disconnect equipment setup.
14. Power Meter
a. Performance Check
(1) Press TI keys as listed in (a) and (b) below:
(a) BLUE.
(b) INSTR PRESET.
(2) Connect range calibrator POWER METER connector to TI SENSOR input.
(3) Set range calibrator switches as listed in (a) through (c) below:
(a) FUNCTION STANDBY.
(b) POLARITY NORMAL.
(c) RANGE 1 m W.
(4) Press TI keys as listed in (a) through (d) below:
(a)
RF POWER.
(b)
ZERO (wait for the instrument to zero.)
(c)
DATA 10.1.
(d)
DATA SPCL.
(5) Take the average of several readings. If TI indication is not within limits specified
in first row of table 17, perform b below.
(6) Repeat (4) and (5) above using remaining TI special functions in table 17. If TI
indication is not within limits specified in table 17, perform b below.
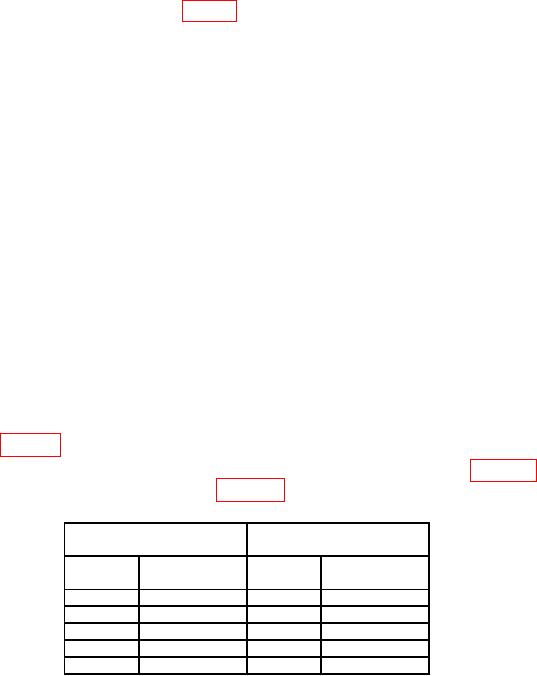
Table 17. Zero Accuracy
Test instrument Serial
Test instrument Serial
prefix 2305A to 2449A
prefix 2451A and above
Special
Indication
Special
Indication
function
limit
function
limit
0.06 μW
0.051 μW
10.1
10.1
0.1 μW
0.06 μW
10.2
10.2
0.2 μW
10.3
0.001 mW
10.3
10.4
0.01 mW
10.4
0.001 mW
10.5
0.1 mW
10.5
0.01 mW
(7) Set range calibrator to calibrate.
(8) Press TI keys as listed in (a) through (g) below:
(a)
DATA 10.0.
(b)
DATA SPCL.
(c)
CALIBRATION CALIBRATE.
(d)
BLUE.
(e)
CALIBRATION CALIBRATE.
(f)
DATA 10.1.